Code & Go Activity One
This class will cover the following topics:
- Introductory discussion about what will be learned in this class
- Understanding what a robot is
- Understanding what a command means
- Understanding the different parts of the mouse robot
- How to program the mouse robot to move
Materials Needed
- Pictures of different robots
- Mouse robot
Have a discussion about what a robot is. It is a machine that is built to perform a certain job. Ask the class if anyone can give an example of a robot. They are programmed by people to be able to perform a task. Have pictures around the room to exhibit examples of different robots in action.
Play a robot game at this point to show the class how directions are followed. Children will be reinforced about their directions, build upon their listening skills, understand what a command means, and strengthen their ability to follow directions. This is the beginning of the concept of programming for young children.
Split the class in half. One half of the class will be the robots and the other half will be the programmers. Before getting started, model for the class what is expected for them to do. Give a command to be followed and the (child) robot follows the command. Commands should be simple and easily understood. Walk forward 3 steps, walk backwards 2 steps, turn left, turn right. More complex commands will have 2 or more parts to be followed. Walk forward 2 steps then make left turn and go 3 steps. You can create whatever commands are appropriate for the age group you are working with. Create index cards with pictorial commands that the children can use with their partner or the teacher can use the cards with the entire class. Once this activity has been completed with the class children should switch roles so each child gets to be a robot and a programmer.
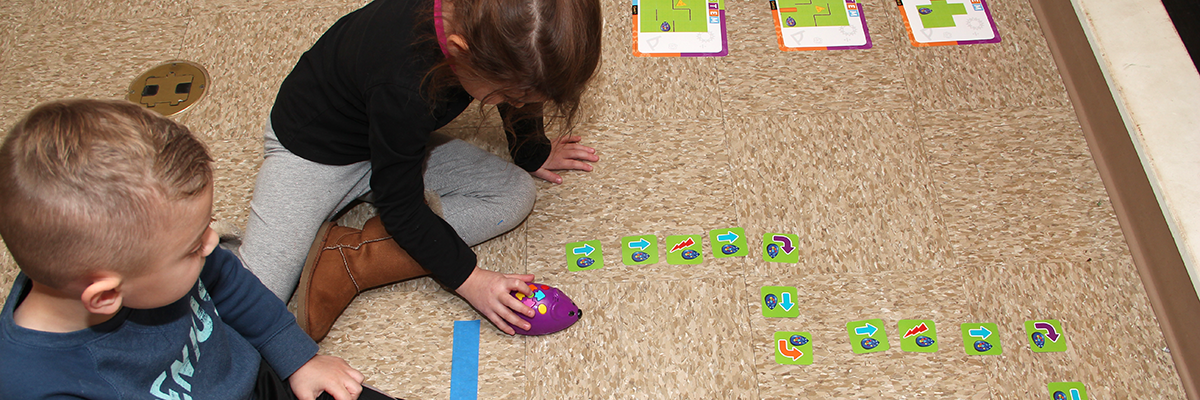
Once this activity is completed move on to using the mouse robot. Show the class the mouse robot and explain the different parts found on the top of its body. It’s suggested to have a color chart showing in pictorial form each command and what it does. Your children can refer to it when needed.
- Blue arrow is for Forward
- Yellow arrow is for Backward
- Orange arrow is for Left Turn
- Purple arrow is for Right Turn
- Green button is pressed to make the mouse go after programming the arrows in sequence
- Yellow button is to cancel program
- Red button is for one of three random actions
- The on and off switch is found on the bottom of the mouse. Off is to the left, normal speed is in the middle and hyper (faster) speed is to the right.
Once you have explained the different parts of the mouse robot break the class into groups of 2. Each group will get a mouse robot to begin their programming experience. Have each child press the blue arrow 2 times and then the green button to make the mouse robot move 2 equal spaces. Press the yellow button to delete the program. Repeat this procedure pressing the yellow arrow 2 times to make the mouse move backwards 2 spaces. Press the yellow button to delete the program. When pressing either the orange or purple arrows for left or right turns you need to follow that command with either a forward or backward command or else the mouse will turn and just stop.
Once the children have a working knowledge about how the arrows and buttons work, allow them to practice on their own with their partner. Make sure each child gets their time with the mouse robot. It is important for each child to physically press the arrows and buttons, so they get a feel for how the robot works. Give extra help to the children who seem to have difficulty with this concept.